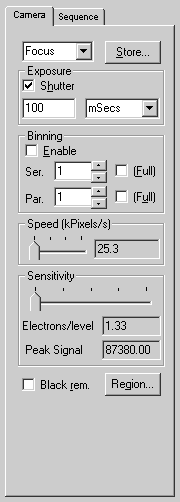

Provides rapid access and control of the camera system to effect accurate focusing and camera set up. To change or adjust the speed and format with which the camera is read out, select the Camera tab. Click in the first drop down box to select a previously named setting, or click on the Store button to access the parameters dialogue box.
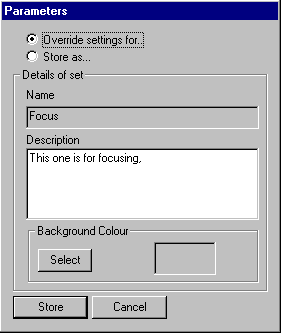
Check the 'Override settings for...' to make changes to settings, or check 'Store as...' for the creation of a new setting. The software allows for clear identification of the settings being used with the facility to change the background colour of the Camera tab. Click the option of changing the background colour of the Camera tab, select the colour, click on OK then the Store button to save or Cancel to abandon changes. The background colour of the Camera tab will change accordingly.
Exposure This enables the user to set the time the shutter remains open. Enter a value required for the exposure duration and select the appropriate units. Check or uncheck to Enable/Disable the shutter as appropriate. If the shutter is disabled, the system waits for the selected shutter period without opening the shutter before proceeding. If the shutter is selected, and no delay specified, the camera will use ‘Fast grab’ mode for highest speed acquisition.
Binning Binning allows charge from each pixel to be added (in both vertical and horizontal directions) to its previous neighbouring pixel. This can be done an unlimited number of times for the SI and SK series systems, in either or both directions while the CCD is being read out. For binning with an SI or SK system, enter the binning factors separately in the Serial or Parallel box, for example: 1x1,1x2, 2x2, 1x4, 4x4, 1x8, 8x8, 1x16, 16x16. In addition you may check the full serial binning and/or full parallel binning boxes to bin the CCD entirely in one direction giving one dimensional (single) line read out (SI and SK series only). Check or uncheck the Enable/Disable binning box.
NOTE: in the FK, FE and NeuroCam cameras, binning in the horizontal direction is only possible at speeds up to 2MHz.
This is a totally noise-free process and leads to higher signal levels together with significant reduction in the readout time, although it does have the disadvantage of reducing the spatial resolution.
Speed (kPixels/s) : The readout rate is the rate at which the camera electronics reads each CCD in K (thousands) of pixels per second. To achieve a higher quality image a slower read out speed is required. Select the pixel rate by adjusting the sliding scale to requirements. Click on the upward arrow on the sliding scale and drag to required point. The readout rate figures will consequently adjust and confirm levels chosen in the associated box.
NOTE: Changing the speed also changes the sensitivity, once selected with the mouse, the arrow keys can be used to make changes.
Sensitivity Sensitivity is the gain of the electronics. It may be adjusted to suit the appropriate CCD signal levels i.e. low signals may require an increase in sensitivity and high signal levels may require a decrease in sensitivity. Select the sensitivity by adjusting the sliding scale. Click on the upward arrow on the sliding scale and drag to required point. The electrons/level and peak signal figures will adjust and confirm level chosen.
In many applications a good compromise is to set the sensitivity such that the full range of the electronics (shown in the 'peak signal' box) corresponds to the full well or saturation level of the CCD in your camera.
Black rem. Check or uncheck the black removal box accordingly. The camera data are all unsigned images in the range 0-4095 (12 bits), 0-16367 (14 bits) or 0-65535 (16 bits), depending on your camera. The black level represents the electronic output level of the DDE in the absence of any signal or dark current. It may be removed or corrected as required.
Region The user may define a region which is an area of interest and which can be any rectangular area within the image. It can dictate the actual part of the chip (CCD) being read by the electronics. It is also possible to have statistical measurements made within the selected sub region for further analysis even while a longer region is being read out.
From the Camera control tab, click on the Region button, the Set Region dialogue box will appear.
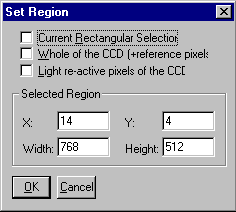
Check or uncheck the following: Current Rectangular Selection - this is the previously selected area using the Shift/mouse drag. Whole of the CCD - this is the whole image including the dark (overscan) reference pixels at the edge of the CCD. Light sensitive pixels of the CCD - this is the actual sensitive area without the reference pixels. The software defaults to light sensitive pixels of the CCD. Within the Selected region box enter the details of the X and Y position together with width and height as required. If you use the left mouse button together with the shift or Ctrl key on an existing image these parameters will be entered in the box eliminating the need to be entered separately. Click on OK to accept the parameters or Cancel to abandon the changes and revert to the main window.
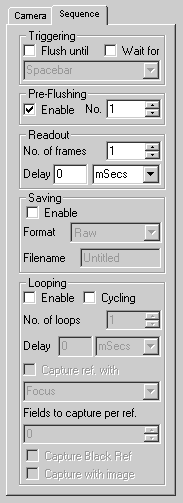
To create a new sequence of single or multi image acquisition, select the Sequence tab.
Triggering The Flush Until check box in the triggering section causes the CCD to be continually flushed out while waiting for image capture, so as to minimise the build up of dark current over extended delays before the image is to be captured. The triggering that initiates the capture of a sequence can come from different sources. Check or uncheck Flush until trigger (only available with SK or SI series systems) and Wait for trigger as appropriate. Choose either Spacebar or User Port as the trigger source by clicking the downward arrow to access options.
Pre- flushing Once the triggering event has occurred, the capturing sequence can optionally call for any signal already present on the CCD to be flushed out before the first exposure occurs. Check or uncheck Enable option. Enter the Number of flushes required by either entering the number in the No. box or using the up/down arrows to select the number. Each flush fully clears the CCD. Users may occasionally want to use more than a single flush should the CCD have previously been fully saturated immediately before sequence capture.
Readout Enter the number of frames required (full CCD or sub-region readout as set on the focus tab) by either entering the number in the box or using the up/down arrows to select the number. Enter the delay duration and units between frames as required. (Click on the down arrow to indicate other unit options available). This allows short exposures to be taken with longer intervals between them. These images will be taken after a single trigger.
Saving Saving in Sequence allows the frames to be saved to disk either image by image or by acquiring a succession of images then saving as a sequence of individual images. See illustration below in Looping. Saving a sequence at this time will record the pixel data only. The camera setup and calibration details remain in the original .apf file and should be saved separately before overwriting the memory by acquiring new images, closing the software or selecting File/New or the New icon.
To save, check the enable box to access File format and filename options. A Format can be chosen by clicking on the downward arrow and clicking on either: RAW, Imager-1, Imager-2, FITS or 16-bit TIFF. The .xxx extension in the filename is set to three letters ie: Raw, img, img, fit or tif depending on the format selected. Specific Filenames can be typed in the Filename box. Filenames default to 'Untitled1.xxx, Untitled2.xxx' etc.
Looping Looping is a feature which allows a number of readout sequence operations to be implemented automatically with a defined time delay between sets of images if desired e.g. with 10 frames and 10 loops set, gives a total of 100 images.
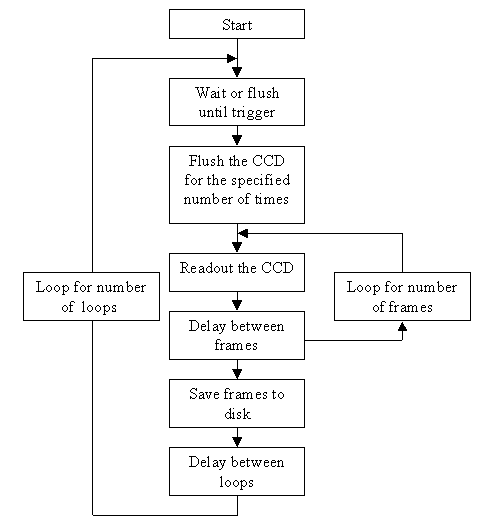
Cycling is a feature where a loop of images are taken but, each loop will overwrite the previous loop and so on. Check or uncheck to Enable/Disable Looping. Check or uncheck to Enable/Disable cycling. Enter the Number of loops required (if not cycling) either by entering the number in the box or using the up/down arrows to indicate the number. Enter delay duration and units between loops (use the down arrow to indicate other unit options available).